INSTALL KALI LINUX AS THE ONLY OPERATING SYSTEM IN YOUR PC/LAPTOP
NOW WE ARE ABOUT TO INSTALL KALI LINUX AS THE ONLY OS AVAILABLE ON YOUR PC. So be sure you want to do this. Installing Kali as the main os will completely ☠ kill the widows or whatever you had in your PC. HIT THE WEB AND SEARCH HOW TO BACKUP WINDOWS INTO A USB BECAUSE YOU NEED TO BACKUP IF YOU WANT.

IF YOU ARE STILL A NOOB AND YOU DON'T KNOW EVEN A BIT ABOUT kali Linux pen-testing and hacking, THEN BOY YOU ARE IN A RIGHT PAGE.🤔
Kali Linux is a distribution specifically designed to be a toolkit for professional pen-testers. As such, it might be very attractive to new Linux users who are interested in security. However, Kali is not designed as a general-purpose Linux distro.
Some elements of its design are simply not suited for use as a general-purpose desktop.
If you're a new Linux user who installs Kali Linux chances are you will have a frustrating experience. The Kali Linux maintainers even have a FAQ page.
I WILL TELL YOU EVERYTHING ABOUT THIS OPERATING SYSTEM AND ETHICAL HACKERS.
Throughout the history of Kali (and its predecessors BackTrack, WHAX, and Whoppix), the default user was the root, This is no more. Kali Linux is no longer using the superuser account, root, as default in Kali 2020.1. The default user account is now a standard, unprivileged, user.
So with this, should you use Kali as your daily driver, as the primary OS? It’s up to you.
There wasn’t anything really stopping you before, I just don’t encourage it. We still don’t. But it's a helping hand for the people who are familiar with Kali enough.“Kali Live” hasn’t been forgotten about – it’s just moved to its own image.
This allows you to try Kali without installing it and is perfect for running off a USB stick. You can install from this image, however, it will require a network connection (this is why we suggest the stand-alone install image for most users).
With the latest release, there is a major change switching from GNOME to Xfce. That wasn’t the end for improving Kali; The developers have kept on going with the design work, and have more updates:
GNOME There is now a new theme for GNOME users and as an additional bonus, there is a light and dark theme!
With XFCE and GNOME having had a Kali Linux look and feel update, it’s time to go back to the roots (days of backtrack-Linux) and give some love and attention to KDE Plasma. Introducing the dark and light themes for KDE Plasma.
CLICK ON THE IMAGES TO ZOOM.
 It was intended that both “installer” & “live” could be customized during setup, to select which meta package and desktop environment to use. When they did that, they couldn’t include metapackages beyond default in those images, as it would create too large of an ISO.
As the packages were not in the image if you selected anything other than the default options it would require network access to obtain the missing packages beyond the default.
After release, they noticed some users selecting “everything” and then waiting hours for installs to happen. They couldn’t understand why the installs were taking so long.
It was intended that both “installer” & “live” could be customized during setup, to select which meta package and desktop environment to use. When they did that, they couldn’t include metapackages beyond default in those images, as it would create too large of an ISO.
As the packages were not in the image if you selected anything other than the default options it would require network access to obtain the missing packages beyond the default.
After release, they noticed some users selecting “everything” and then waiting hours for installs to happen. They couldn’t understand why the installs were taking so long.
BUT BEFORE THAT PLEASE DO CHECK THE DISCLAIMER SECTION AT THE TOPMOST MENU.🤨

IF YOU ALREADY READ THE DISCLAIMER THEN ONLY CONSIDER READING THIS PAGE.
Ethical Hacking with Kali Linux USB.
OKAY BOY DON'T WORRY NOW, AM HERE TO HELP YOU WITH ALL YOUR KALI LINUX RELATED ISSUES.✌
YOU WILL NEED-
- Kali Linux iso file.👉 CLICK HERE to download.
- BALENA Etcher software.👉CLICK HERE to download.
- A PC or Laptop obviously.
- A USB of 4 GB to flash the iso.
- And A bit of patience.

And that's all bro.
ONCE YOU HAVE INSTALLED THE BALENA ETCHER AND DOWNLOADED THE KALI LINUX ISO WHICH SHOULD BE THE LATEST ISO.
NOW, PLUGIN YOUR USB.
LAUNCH THE BALENA ETCHER.👌
FOLLOW THESE-
- Format your Pendrive.
- After launching the balena etcher, locate and select the downloaded Kali Linux iso file.
- Select your USB.🤞
- Cancel all other Background running apps.
- CLICK on the "FLASH!" button.
- Wait for it bro 'cause it's taking time to heaven.🤢

NOW, BOY, YOU MIGHT GET ERROR IF YOU DON'T FORMAT YOUR USB BEFORE LAUNCHING THE APP.🎁
SO, it's almost done.
now CLOSE THE APP.
AND THEN RESTART YOUR PC.
READ THESE CAREFULLY-
NOTE- DON'T MESS WITH ANY OPTIONS OR YOU WILL SUFFER.
IF YOU HAVE Windows 7 pc then press F2 when the screen appears and if it shows you to press F2 to open BIOS.
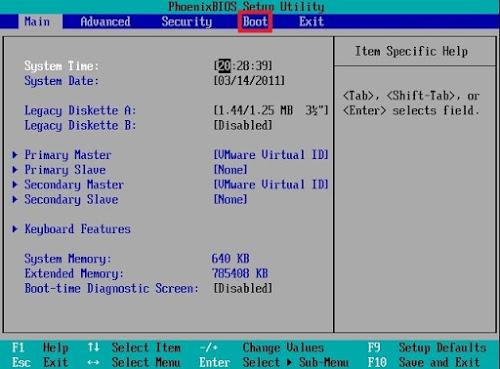
- OPEN THE BIOS SETUP.>
- GO TO BOOT MENU.>
- GO TO SECURITY OPTION.>
- ENABLE LEGACY BOOT.
- DISABLE SECURE BOOT.
- CHANGE BOOT ORDER PRIORITY AND MAKE USB THE FIRST BOOT OPTION.
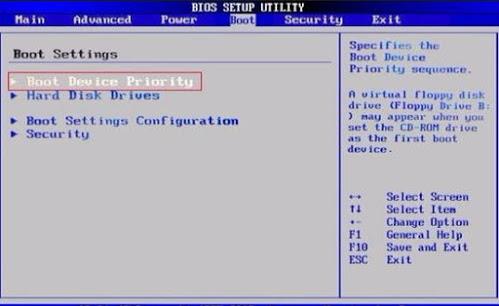
SAVE AND EXIT.
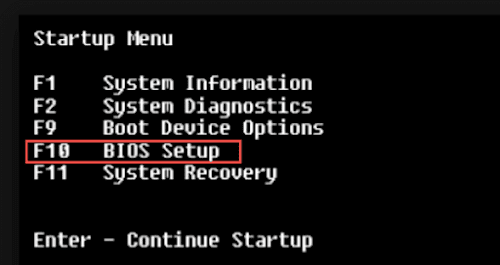
IF YOU HAVE HP LAPTOP THEN YOUR BIOS MIGHT LOOK A BIT DIFFERENT. SO PRESS ESC KEY MANY TIMES TILL A MENU APPEARS. AND THEN SELECT THE BIOS OPTION WHICH HAS KEY ASSIGNED F10.
POOF ITS DONE BRO. NOW IF YOU SELECTED YOUR USB FROM F9 OR IN CASE OF A WIN7 PC YOU HAVE CHANGED THE BOOT ORDER THEN KEEP YOU USB AS IT IS IN THE USB PORT.
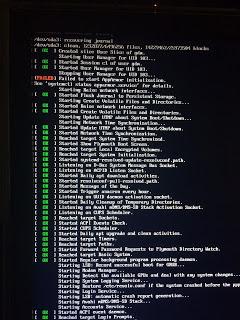
NOW THIS WILL APPEAR-
AND THEN KALI LINUX LOGO WILL APPEAR.
AND THEN THIS MENU WILL APPEAR-

SELECT THE "Graphical Install" OPTION.
AND NOW BINGO!!!!!!!!-
 |
Now, this is just started.>
Select the language.

Now select your region.>
This is important so you can't choose the wrong option.

Now choose American English as shown above.

This above image shows how the screen will appear now.

Now leave everything as default, don't mess with anything else during the installation.

YOUR NAME WILL BE THE DOMAIN NAME.
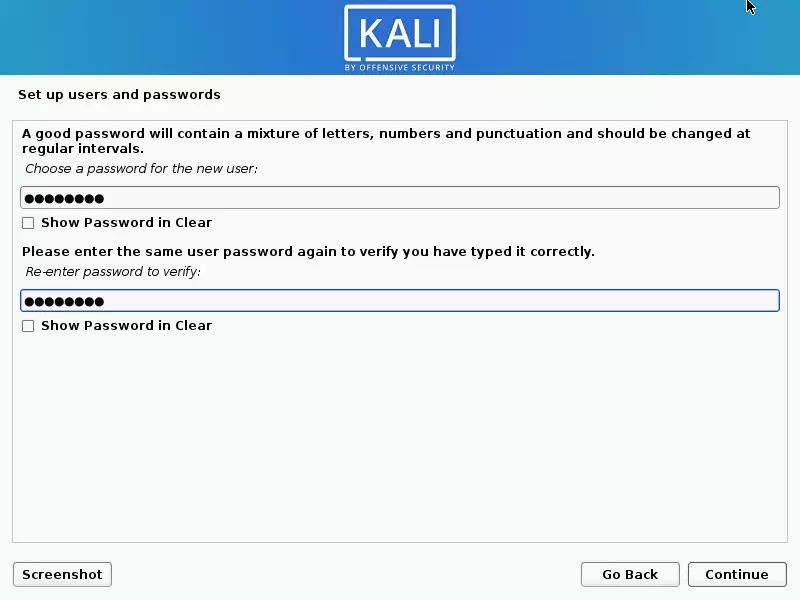
Make a good password. And make sure you remember it 'cause Kali will not allow you to reset your password soon.

This is the most important step so don't mess up things or your whole time will be wasted.
IF IT ASKS YOU TO CHOOSE A DISK NOW SO CHOOSE GUIDED ENTIRE DISK AND FROM THERE CHOOSE YOUR HARD DISK AND THEN IT MAY ASK YOU ONE MORE QUESTION SO ANSWER "ALL PARTITION IN ONE DISK".

This is showing my hard disk. But don't worry, your HARD DISK will be clearly seen so choose that.
My scene is messy so I will tell you what will appear in the above image- ATA hard disk and USB(4GB now in use by iso).
Remember to choose the HARD DISK carefully.

This process will be done soon.

Leave it blank.

Now the most important step arrives so be real careful.
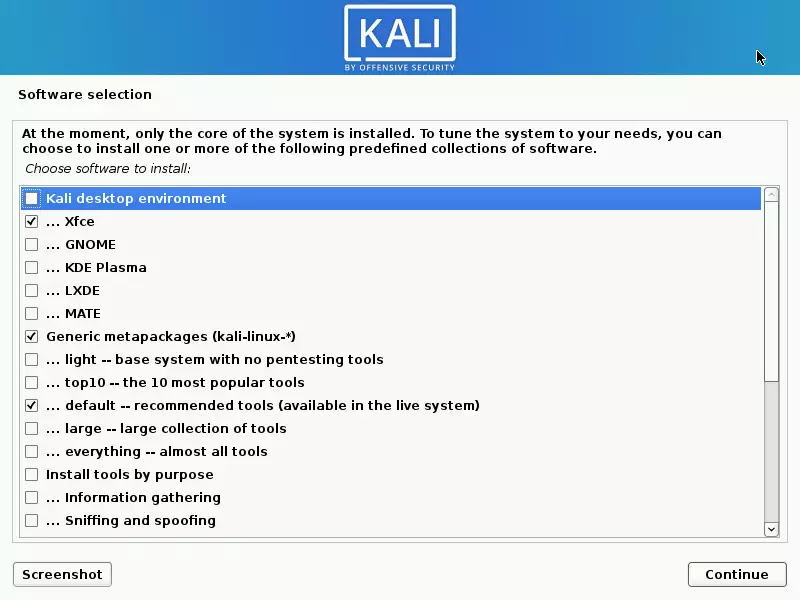
LET EVERYTHING IN THE SOFTWARE INSTALLATION MENU BE DEFAULT. SO DONT MESS WITH ANYTHING HERE.

CLICK YES.

Now is the above image there should be your HARD DISK name and the 4 Gb USB will also be displayed. You have to choose YOUR HARD DISK.
AFTER THE INSTALLATION COMPLETES THE BELOW IMAGE SCREEN WILL APPEAR.
CLICK CONTINUE.
NOW REMOVE THE 4GB USB THEN FINISH THE INSTALLATION THEN AFTER THIS PROCESS IS COMPLETED RESTART THE PC.
NOTE- NOW YOUR PC HAS ONLY KALI SO WHEN YOU START THE PC, KALI LOGO WILL APPEAR INSTEAD OF THE WINDOWS LOGO.
✌CHEERS FOR OFFENSIVE SECURITY✌